Civ V Random Game Generator Twitterbot
by Katelyn
If you’re like me and you want to skip ahead to the ending of a tutorial to see the final product, here is the bot in action and here is the repo.
I needed a new project to work on last weekend, so I decided to revisit an idea that I had last year. In my blog for DBC, I wrote a post about Ruby classes and used a Civ V random game generator as an example. For those who are way cooler than I am and don’t spend hours (cumulatively, days) on a single video game, in Civilization V there are multiple settings that you can select when you create a new game. These include which civ you’ll play as (each one has various unique bonuses and attributes), difficulty level, map size/type, number of AI players, and requisite conditions for victory, among many more. It’s easy to fall into a rut with these settings, so a random game generator helps to shake things up.
Since I haven’t made one before, I thought that I’d make this project into a Twitterbot. Once daily the bot will tweet a new set of randomly generated rules.
$ rails new civ-game-gen --skip-turbolinks -d postgresqlI always skip turbolinks out of habit. For one thing, if I keep this program strictly to use as a backend for a Twitterbot, then I have no need for turbolinks anyway. If I do decide to add a frontend for this project (e.g., a single page app where you can generate your own random game rules), I don’t need turbolinks for that either. I find them to be more trouble than they’re worth. I also added Postgres even though I don’t necessarily need a database – it would be helpful if I wanted a way to save generated games (e.g., an “Add to Favorites” option).
Anyway, let’s generate our model. We only need one, because we’ll let it handle the rule generation for each game. This is a tiny app, so there aren’t very many moving parts.
$ rails g model CivGameI’m going to start by adding some constants. These will provide the data for our CivGame class to pick from. I chose to put these constants into a separate file since they’ll be used just one time per game generation. Leaving these large arrays scoped to CivGame also felt too cluttered.
# config/initializers/game_constants.rb

CIVS = ["American", "Arabian", "Assyrian", "Austrian", "Aztec", "Babylonian", "Brazilian",
        "Byzantine", "Carthaginian", "Celtic", "Chinese", "Danish", "Dutch", "Egyptian",
        "English", "Ethiopian", "French", "German", "Greek", "Hunnic", "Incan", "Indian",
        "Indonesian", "Iroquois", "Japanese", "Korean", "Mayan", "Mongolian", "Moroccan",
        "Ottoman", "Persian", "Polish", "Polynesian", "Portuguese", "Roman", "Russian",
        "Shoshone", "Siamese", "Songhai", "Spanish", "Swedish", "Venetian", "Zulu"]

MAP_SIZES = ["Duel", "Tiny", "Small", "Standard", "Large", "Huge"]

MAP_TYPES = ["Archipelago", "Continents", "4 Corners", "Fractal", "Great Plains", "Highlands",
             "Ice Age", "Inland Sea", "Lakes", "North vs. South", "Oval", "Pangea", "Skirmish",
             "Small Continents", "Terra", "Tiny Islands", "West vs. East", "Amazon Plus",
             "Arborea", "Boreal", "Europe", "Frontier", "Great Plains Plus", "Hemispheres",
             "Rainforest", "Tilted Axis", "Africa", "Americas", "Asia", "Bering Strait",
             "British Isles", "Caribbean", "Continents Plus", "Earth", "Earth Plus", "Fractal",
             "Eastern United States", "Ice Age", "Inland Sea", "Japanese Mainland", "Pangea Plus",
             "Mediterranean", "Mesopotamia", "Ring", "Sandstorm", "Shuffle"]

CONDITIONS = ["Domination", "Cultural", "Science", "Diplomatic", "Time"]
Now let’s fill out our class to use these constants.
# app/models/civ_game.rb

class CivGame
  def initialize
    @player_civ = CIVS.sample
    @num_civs = rand(1..21)
    @num_city_states = city_states
    @map_type = MAP_TYPES.sample
    @map_size = MAP_SIZES.sample
    @num_conditions = rand(1..5)
    @victory = set_victory_conditions
  end
end
In the initialize method, I can quickly set up the instance variables that I’ll need.
@player_civis, of course, the player’s civilization, chosen at random from ourCIVSarray@num_civschooses a random number of civs to be controlled by the computer@num_city_statescalls a separate method for choosing the number of city states, as we’ll see in a moment@map_typeand@map_sizesample their respective arrays and store the results to these variables@num_conditionschooses how many victory conditions will be possible, then@victorycalls a separate method to determine which ones (again, we’ll see this below)
That leaves us with just a few methods to write out.
# app/models/civ_game.rb

class CivGame

  # ...

  def city_states
    if @num_civs < 5
      return rand(0..21)
    else
      rand(0..41)
    end
  end

  def set_victory_conditions
    if @num_conditions == 5
      return "All"
    else
      CONDITIONS.sample(@num_conditions).join(", ")
    end
  end

  def print_rules
    "Player: #{@player_civ}\n" +
    "AI Civs: #{@num_civs}\n" +
    "City states: #{@num_city_states}\n" +
    "Map: #{@map_type}\n" +
    "Size: #{@map_size}\n" +
    "Victory: #{@victory}\n"
  end
end- The
city_statesmethod attempts to balance the number of city states against the number of civilizations on the board. You can still end up with some extremes (e.g., 17 civs and 2 city states), but that can also make for an interesting game set_victory_conditionsevaluates how many conditions were chosen and simply returns “All” if that number is 5, otherwise it samples theCONDITIONSarray the appropriate number of times and returns the results as a single string. For example,["Science", "Diplomacy", "Domination"]would become “Science, Diplomacy, Domination”print_rulessimply prints out the rules in a Twitter-friendly format, using the variables that we previously initialized. I had to do a little testing to make sure that regardless of the rules set by this program, it would not exceed the 140-character limit.
And that’s it! That’s all we need to generate a set of rules. Let’s make a new file for our script and try it out in the console.
# app/models/bot.rb

game = CivGame.new
print game.print_rules
$ rails runner app/models/bot.rb
Running via Spring preloader in process 80642
Player: Venetian
AI Civs: 10
City states: 3
Map: Earth
Size: Huge
Victory: Cultural, Time, Domination, DiplomaticGreat! Now let’s set it up for Twitter. I made the Twitter account @CivGameGen using a new email address and Google Voice phone number (the phone number will be required to create the Twitter app). Next, I went to the Twitter apps page to register the app and get the API information that I’d need. I’m not going to post mine here, obviously. Make sure that you protect your keys and tokens! That includes keeping such information out of your tracked git files. Below we’ll look at how to use Heroku’s ENV key-value pairs to store this information securely.
If you’re following along and you don’t already use Heroku, I recommend setting up your account now and installing the Heroku Toolbelt. It makes deployment a breeze. Heroku also has a ton of useful information and docs, such as this getting started guide for Rails. Yes, I am an unapologetic Heroku fangirl. But with good reason – using Heroku is what really got me into programming, because I saw my ideas brought to life on the web instead of existing only as tiny command-line programs.
Anyway, next I added gem 'twitter' to my Gemfile and ran bundle install, then returned to my bot.rb file to add the client information.
# app/models/bot.rb

require 'twitter'

client = Twitter::REST::Client.new do |config|
  config.consumer_key        = ENV["CONSUMER_KEY"]
  config.consumer_secret     = ENV["CONSUMER_SECRET"]
  config.access_token        = ENV["ACCESS_TOKEN"]
  config.access_token_secret = ENV["ACCESS_SECRET"]
end

game = CivGame.new
client.update(game.print_rules)
If you’re at all familiar with hashes, the syntax on the right side within the block should look familiar. Instead of copying and pasting the Twitter API information here (readable to anyone who found this public repo), we’ll store this information on Heroku. This can either be done via the command line or on Heroku’s website. To use the command line, you can follow these instructions and the following command:
$ heroku config:set CONSUMER_KEY=xxxx CONSUMER_SECRET=xxxx (etc...)To do it from the website, go to your Heroku account, click on the app you’re working on, and go to the settings tab. These two routes achieve the same goal – storing your API information in the app environment, where it remains hidden.
Once we deploy to Heroku via the command line, the next step is to set up Heroku Scheduler so that it will run our script at a set time every day. This will prompt you for a credit card for verification, but I’ve never been charged for this service. The scheduler is really easy to use. All you need to do is enter the command (or rake task) and the time it should run.
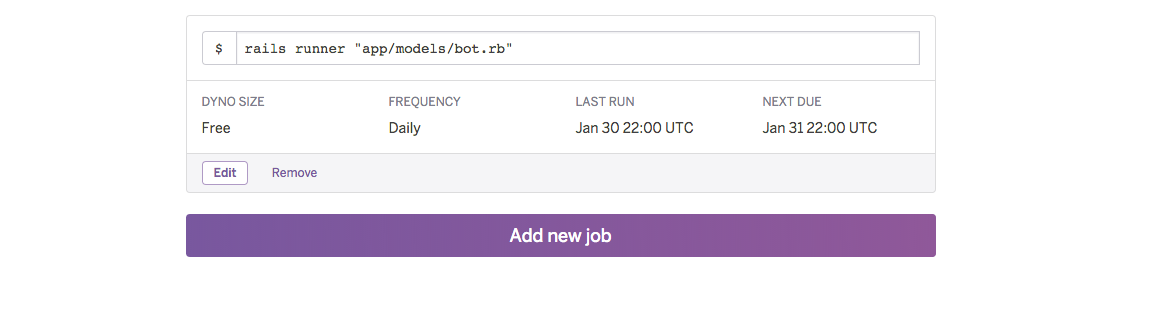
And that’s it! Now every day at 5pm EST, the bot tweets out a new set of rules for Civ V (actually it does it twice, in case the first set is too awful to play).
This project took longer than I thought it would, particularly given my experience with Rails, Heroku, and the Amazon S3 API. And while this was a simpler project than my iOS backend server, it presented its own unique challenges. For one thing, I wasn’t familiar with the rails runner command and couldn’t figure out why my scheduler didn’t run with the ruby command. So aside from the fact that I am a complete geek about Civ, this was a worthwhile project for me to learn from!
Subscribe via RSS